The Great Crochet Stitch Strap Experiment
I love a good crocheted bag. I’ve met few crocheters who don’t! But I think the one part of a bag that every crocheter struggles with at least once, is the straps.
Crochet stitches are (mostly) stretchy by nature, so crocheting a strap is sure to stretch. Not everyone wants to line their bags and straps, make complicated cords, or use other materials. Or, you might just be so eager to use your new bag that you think a lining can wait! But, no one wants a bag that is dragging on the ground from a stretched out strap.
So I started the Great Crochet Stitch Strap Experiment to figure what the best possible crochet stitch is to minimize stretch. Really, it just consists of me making thirteen samples of different crochet stitches, stretching them out, and recording my findings, but in a community where so much is based on opinion, I thought a more scientific approach was needed. I attempted to make each sample as uniform as possible, aiming for 1.5” wide and 10” tall, using worsted weight acrylic yarn and a 4.25mm hook. To test the samples, I made a small loop at the end of each one and hung them from a dowel. Then, I added a lightweight metal S hook to the opposite end, and hung a 2.5lb weight from the S hook. I recorded the type of stitch, the direction it was stitched in*, the unstretched/beginning length, the stretched length, and the length immediately after stretching.
*I refer to these as “side to side” when crocheting short rows side to side and building length with each new row, and “end to end” when crocheting long rows from end to end and building width with each new row.
I really thought that the results were going to be straight forward, but I was surprised to discover that there’s no definite winner. Let me explain…
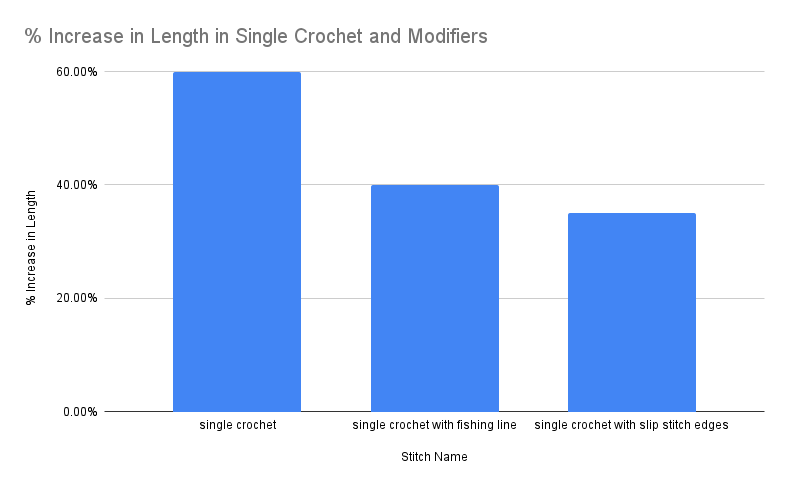
I began with single crochet as my baseline. Working side to side, my starting chain was the width of my sample, and I crocheted repeated rows of 5 sc stitches until my sample measured 10” long. Then, I made the same sample with two modifiers: adding a slip stitch border, and working double stranded with 12lb fishing line. In testing these, I was able to prove that these modifers can significantly alter the amount of stretch in a strap:
While single crochet (side to side) stretched 60” longer than the original size, adding fishing line resulted in only a 40% increase in length, and even better, adding a slip stitch border resulted in a 35% increase.
Additionally, there’s also a difference to be determined when working side to side (building length) versus end to end (building width). Consistently, I found that crochet stitches have a lot less stretch across the width of a stitch than across the height of the stitch.
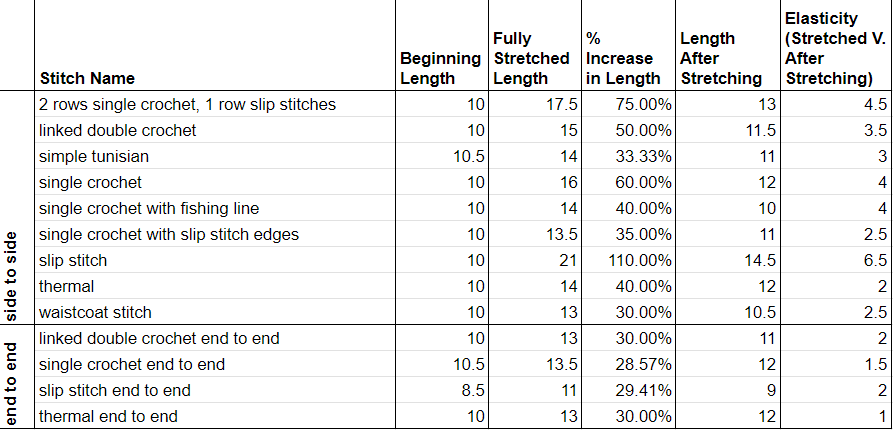
Personally, I’ve always preferred working a strap side to side, beginning by determining the width and working my rows side to side until I reach the preferred length. Since it’s easier to adjust your length as you work, this made the most sense to me. But after seeing these results, consider my opinion changed. With every stitch type tested, there was significantly less stretch when the strap was created end to end, beginning with a long starting chain and adding width with each new row. Once again using single crochet stitched side to side as a baseline with a stretch increase of 60%, you can see that stitching in single crochet end to end resulted in only a 28.57% increase in length when stretched.
Now of course there are down sides to this. For starters, does anyone really want to stitch into a 40” starting chain? It’s more difficult to adjust your strap length as you work, since you determine your length with your starting chain instead of rows. Tension can also be a challenge; while my goal was to make each sample 10” long before stretching, it was markedly more difficult to make my samples exactly 10” long when working end to end.
My samples for slip stitch end to end and single crochet end to end began at 10” after the first row, but when completed, slip stitch end to end measured only 8.5” unstretched, while single crochet end to end measured 10.5” unstretched.
So which stitch wins?
If you’re determining the winner by stretch alone, the winner is single crochet, stitched end to end, followed closely by slip stitch in the back loop only, stitched end to end. But, these stitches also have their downsides…
There are also stitch characteristics to consider. Is it comfortable? Symmetrical? Appealing to look at? Does it suit the type of bag you’re making? A larger bag will typically required a wider strap, which will mean more stitches - an unappealing undertaking when using a difficult stitch. Another point to consider is the elasticity of each strap. Once it has been stretched, does it return to the original size, or maintain that stretch?
In attempting to make a 10” sample for each of these winning stitches, my sample size was drastically altered due to tension of the stitches. This may result in multiple attempts before your strap is actually made at the intended length. That’s a lot of frogging for a longer strap!
Let’s take a deeper look at some of my favorite results:
The following are my opinions based upon the findings of this experiment and charactistics of the stitch samples I created. I find that there can be multiple winners, depending on the characteristics of the strap you wish to make.
Slip Stitch End to End: To start, let’s compare: Slip Stitch side to side (made in the back loop only) had a stretched length of 110% of the beginning length, and the most elasticity, “shrinking” back 6.5” inches after stretching. This is a fabulous example of what we don’t want to see in a strap when considering the length. However, these characteristics can be excellent qualities when considering the width of the strap. This contributes to slip stitch end to end being a winner for me. A downside I’ve found with slip stitch end to end is that your unstretched length will likely be shorter than intended due to the tension of the stitch, making it difficult to determine if you will achieve your intended length. However, this can also be an unexpected positive: The “shrinkage” of the unstretched version can negate some of the expected stretch. Forgive my rough math, but if the starting chain is 10”, the finished strap is 8.5”, and the stretched length is 11”, that’s only a 10% increase in length (from the intended length) when stretched. I interpret this as a major benefit if you neglect your unstretched length and consider only your beginning length. (Granted, I’ve only tested this once!) The biggest con to this stitch? That’s a LOT of slip stitches, and if you’re like me, you probably don’t have that kind of patience.
Single Crochet End to End: Our clear winner by stretch alone, it tends to hold it’s stretch, it’s simple enough to make, and I find that it’s especially suitable for smaller bags and weights. It’s not entirely symmetrical, and can curve a little due to the starting chain, so you may wish to add a slip stitch border for an aesthetic touch. It’s a good, solid stitch!
Thermal Stitch: This was my most requested stitch to test, and I’ve really jumped on the bandwagon with this one. While side to side had a bit more stretch than I expected or prefer to have, it has a very symmetrical look that I love. But end to end was the clear winner for this stitch. It may not have the most symmetrical look (since your final row will be thinner than the rest of the strap), but with a 30% stretch and minimal elasticity, it’s consistent and dependable. Whichever way you choose to use it, be prepared to use about twice as much yarn as the other options - but also embrace the comfort of the double thickness of the strap!
Waistcoat Stitch: I only tested this stitch side to side, mostly because it was such a pain to work with. It would have been easier with a larger hook size, but in the name of science, I was committed to that 4.25mm hook. This stitch can be beautiful, but it was difficult to maintain tension and consistent appearance working back and forth in rows. It doesn’t really outshine the other samples enough for me to use it.
Linked Double Crochet End to End: I’ll admit, I was plesantly surprised here. I’m willing to name this one the winner when when it comes to quick simplicity. My finished length was consistent with the length of my starting chain, it worked up quickly, and had minimal stretch compared to most of the samples. I would recommend an odd number of rows to build symmetry across the width. While it doesn’t have the thickness of the thermal stitch, it is less stiff than single crochet end to end.
With any of these stitches, I recommend giving your strap a thorough stretch occasionally as you work to make sure that the stretched length will be acceptable. With those stitches shown in the chart with a lower elasticity, the strap should mostly hold the stretch as well. Even though some of these stitches are considered winners, it’s important that even the winners have nearly 30% increase in length when stretched; while some had a significant amount more, that’s still a lot of stretch to consider when creating something that you’d like not stretch at all! For a lightweight bag, a crocheted strap can still be great, but you might catch me being more consistent in lining my larger bags with a stronger material going forward.
Please note that these samples were made with acrylic worsted weight yarn and a 4.25mm crochet hook. Different material content and yarn weight, crochet hook size, and personal differences in tension and technique can have different results and may result in more or less stretch than what I experienced with these samples. Results cannot be guaranteed.


